Software
XCode Command-line Tools
Homebrew
XZ
USB Armory
Micro SD with SD Adapter
MacBoox X/iMac
Download Image
Go to Offensive Security's website and download the latest copy of the USB Armory image
Unzip the image
In a terminal go to the directory where the downloaded image is being stored and decompress it
Mac OS X
Setup Networking on USB Armory
Change the IP Address on USB Armory

In a terminal go to the directory where the downloaded image is being stored and decompress it
xz -d kali-2.1.2-usbarmory.img.xz
Format Drive
- Connect the micro SD card to an external card reader.
- Open Disk Utility
- Find the SD card in the left side of the window
- Click the ERASE tab in the middle of the window.
- Next, click on the “Format” dropdown menu and select “MS-DOS (FAT)”
- NOTE: If the SD card is <= 32 GB else select “ExFAT”
- A message will appear asking, “Are you sure you want to erase the partition “[YOUR SD CARD NAME]?” Click “Erase”. Now the computer will delete the contents of your SD card and format it.
- Run the diskutil list to determine the SD card
diskutil list- Note the SD e.g., /dev/disk3
- Open a Terminal and run
dd if=kali-2.1.2-usbarmory.img of=/dev/disk3
Mac OS X
Setup Networking on USB Armory
- Open Terminal and ssh into the USB Armory
ssh root@10.0.0.1
vi /etc/network/interfaces

- Change the address from 10.0.0.2 to 192.168.2.100
- Change the gateway from 10.0.0.1 to 192.168.2.1
- Save the changes
- Reboot the USB Armory
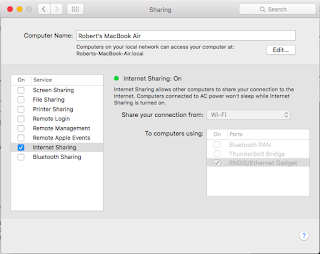
Internet Sharing on the Mac
Go to System Preferences -> Sharing

Go to System Preferences -> Network

Go to System Preferences -> Sharing

Go to System Preferences -> Network

- Select RNDIS/Ethernet Gadget in the left column
- Select Manually from the drop down for Configure iPv4
- Set the IP Address to 192.168.2.1
- Set the Subnet Mask 255.255.255.0
- Leave the Router blank
- Click on Apply
- SSH into the USB Armory using the IP Address set in step 3 above
ssh root@192.168.2.100
- Run an apt-get update
apt-get update
- As long as the host is connected to the Internet, the repository should begin to be updated


No comments:
Post a Comment