As a person who lives, breaths and who falls asleep only to continue dreaming about security, I'm always looking for a way to express the impact of the risk we take. I've created tools, define methodologies to follow, to aid in solving problems or expose it to learn more about it. Today's challenge is how we can maintain enough of our privacy to avoid from being preyed upon.
Then along comes, Google (and Facebook) demonstrating how privacy no longer exists. Bits and bytes of information have now become the next gold rush. And all of it done in plain sight. For example, when you ask Google (Home, Assistance, etc.) a question, or handsfree to dictate a message its collected and stored just in case you need to go back because you forgot the question. Now it might be convenient as a parent to monitor, track and identify what your kid is up to, now imagine this in the hands of some dubious person, a con artist, a competitor, nemesis, your ex, investigators of one form or another.
Don't believe me, give it a try. In any browser, go to https://history.google.com and login to (hopefully, one of many) Google accounts. Now take notice of what you searched for or the websites you happened to have visited... two years ago!
How about the convenience of a smartphone with built-in GPS chip mashed up with your Google account. Go to https://www.google.com/maps/timeline
and admire the pinpoint accuracy of everywhere you have been since you associate your Google account with your phone. It gets even better. Drill down to one of the many dots litter across the map.
Yes, George Orwell is having the last laugh.
After you recover from your head spinning from all of the nefarious possibilities flashing through your head, go ahead and poke around Facebook and discover what it has in store for you.
There are ways to protect your privacy. One is, of course, stop using Google altogether. And in today's world that can be easier said than done.
Of course, there are many ways to try to cover your tracks such as obfuscating your network traffic, but then you run into the issue with exit points involving Google. For example, using TOR to surf, but logging into your Gmail account. You might fool Google into thinking you're at a Cafe in France, but your history will expose you in other ways.
Or in the Google setting switch it off. But the genie is out of the bottle at this point. For all, I know the "switches" are just a placebo. If they can do it in plain sight, they certainly can do it without you knowing about it.
So, workable solutions are, though a bit slower at times, by anonymizing your time spent on the Internet. Wired has a good starting point to consider.
Ref: http://www.wired.com/2014/06/be-anonymous-online/
Final thought. If the rumors are true that Google does little to protect your privacy from your employer or law enforcement, it might be time to get off the Google Grid.
Saturday, April 23, 2016
Saturday, April 16, 2016
Yubico and Mac OS X Short Version
This assumes you already know how to setup your yubikey its a fresh install and you know your way around OS X.
If you don't; just follow follow the instructions available from Yubico's website. I helped to write the document, but some key points were changed so I thought to correct it with this blog.
Install Xcode from the App Store
Depending one your download speeds, this might take awhile so grab a beverage of your choice.
Once this is complete, open a Terminal and accept the Apple's Licensing agreement
Now open a terminal again and install Xcode Command Line Tools
wget wasn't installed, so lets make sure we install it.
Now install the PAM library
Change the newly created line after 'required' to:
Now lets test if it if works.
To test that your yubikey is required to deactivate the screensaver,remove your yubikey when or activate the screensaver, at the login screen type your password.
It should have failed
Re-insert the yubikey, and re-enter the password.
You should now be able to successfully log back in.
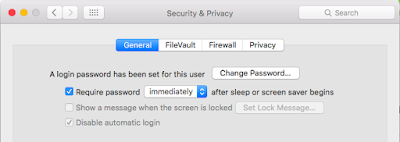
Note: To make sure someone can't bypass the screensaver, be sure to set the select Apple Menu > System Preferences > Security & Privacy. Check "Require password..." and set it to immediately from the dropdown.
Repeat the same process for logging into your Mac except you'll need change the /etc/pam.d/authorization file.
If you don't; just follow follow the instructions available from Yubico's website. I helped to write the document, but some key points were changed so I thought to correct it with this blog.
Install Xcode from the App Store
Depending one your download speeds, this might take awhile so grab a beverage of your choice.
Once this is complete, open a Terminal and accept the Apple's Licensing agreement
sudo xcodebuild -license
Just to be sure the changes were made, suggest rebooting.Now open a terminal again and install Xcode Command Line Tools
sudo xcode-select --install
In the same terminal install Homebrew/usr/bin/ruby -e "$(curl -fsSL https://raw.githubusercontent.com/Homebrew/install/master/install)"
/usr/bin/ruby -e "$(curl -fsSL https://raw.githubusercontent.com/Homebrew/install/master/install)"wget wasn't installed, so lets make sure we install it.
brew install wget
Follow the prompts, a one point it will ask you to enter your root credentials. Once the install is complete, run the brew doctor.brew doctor
Download the command line version of the Yubico tool.cd ~/Downloads
wget -c https://developers.yubico.com/yubikey-personalization/Releases/ykpers-1.17.3-mac.zip
The Mac OS X may have already unzip the file for you, otherwise go ahead and decompress it and double click on the package (pkg)Now install the PAM library
brew install pam_yubico
For good measure, go ahead and reboot. Open a Terminal session and insert your yubikey into a USB port. To create a key type in the following:ykpamcfg -2
Unless you were able to login as root, you will need to copy the key created in /var/root/.yubico into your home directorysudo cp /var/root/.yubico ~/
The .yubico directory nows to be changed to your account.sudo chown -R $(whoami) ~/.yubico
To require the screensaver to have your yubikey inserted to be able to login, edit /etc/pam.d/screensaversudo vi /etc/pam.d/screensaver
Goto the last line that starts with 'auth' and copy [yy] the line and paste [p] it so its the next line.Change the newly created line after 'required' to:
auth required pam_yubico.so mode=challenge-response
Now save the file. Now lets test if it if works.
To test that your yubikey is required to deactivate the screensaver,remove your yubikey when or activate the screensaver, at the login screen type your password.
It should have failed
Re-insert the yubikey, and re-enter the password.
You should now be able to successfully log back in.
Note: To make sure someone can't bypass the screensaver, be sure to set the select Apple Menu > System Preferences > Security & Privacy. Check "Require password..." and set it to immediately from the dropdown.

Repeat the same process for logging into your Mac except you'll need change the /etc/pam.d/authorization file.
sudo vi /etc/pam.d/authorization
Sunday, April 10, 2016
USB Armory
Prerequisites
Software
Hardware
Software
XCode Command-line Tools
Homebrew
XZ
USB Armory
Micro SD with SD Adapter
MacBoox X/iMac
Download Image
Go to Offensive Security's website and download the latest copy of the USB Armory image
Unzip the image
In a terminal go to the directory where the downloaded image is being stored and decompress it
Mac OS X
Setup Networking on USB Armory
Change the IP Address on USB Armory

In a terminal go to the directory where the downloaded image is being stored and decompress it
xz -d kali-2.1.2-usbarmory.img.xz
Format Drive
- Connect the micro SD card to an external card reader.

- WARNING: Formatting the SD card deletes all the data off of the card.
- Open Disk Utility

- Find the SD card in the left side of the window

- Click the ERASE tab in the middle of the window.

- Next, click on the “Format” dropdown menu and select “MS-DOS (FAT)”
- NOTE: If the SD card is <= 32 GB else select “ExFAT”
- A message will appear asking, “Are you sure you want to erase the partition “[YOUR SD CARD NAME]?” Click “Erase”. Now the computer will delete the contents of your SD card and format it.


- Run the diskutil list to determine the SD card
diskutil list- Note the SD e.g., /dev/disk3
- Open a Terminal and run
dd if=kali-2.1.2-usbarmory.img of=/dev/disk3
Mac OS X
Setup Networking on USB Armory
- Open Terminal and ssh into the USB Armory
ssh root@10.0.0.1
vi /etc/network/interfaces

- Change the address from 10.0.0.2 to 192.168.2.100
- Change the gateway from 10.0.0.1 to 192.168.2.1
- Save the changes
- Reboot the USB Armory
Internet Sharing on the Mac
Go to System Preferences -> Sharing

Go to System Preferences -> Network

Go to System Preferences -> Sharing

Go to System Preferences -> Network

- Select RNDIS/Ethernet Gadget in the left column
- Select Manually from the drop down for Configure iPv4
- Set the IP Address to 192.168.2.1
- Set the Subnet Mask 255.255.255.0
- Leave the Router blank
- Click on Apply
- SSH into the USB Armory using the IP Address set in step 3 above
ssh root@192.168.2.100
- Run an apt-get update
apt-get update
- As long as the host is connected to the Internet, the repository should begin to be updated
Subscribe to:
Posts (Atom)