If you don't; just follow follow the instructions available from Yubico's website. I helped to write the document, but some key points were changed so I thought to correct it with this blog.
Install Xcode from the App Store
Depending one your download speeds, this might take awhile so grab a beverage of your choice.
Once this is complete, open a Terminal and accept the Apple's Licensing agreement
sudo xcodebuild -license
Just to be sure the changes were made, suggest rebooting.Now open a terminal again and install Xcode Command Line Tools
sudo xcode-select --install
In the same terminal install Homebrew/usr/bin/ruby -e "$(curl -fsSL https://raw.githubusercontent.com/Homebrew/install/master/install)"
/usr/bin/ruby -e "$(curl -fsSL https://raw.githubusercontent.com/Homebrew/install/master/install)"wget wasn't installed, so lets make sure we install it.
brew install wget
Follow the prompts, a one point it will ask you to enter your root credentials. Once the install is complete, run the brew doctor.brew doctor
Download the command line version of the Yubico tool.cd ~/Downloads
wget -c https://developers.yubico.com/yubikey-personalization/Releases/ykpers-1.17.3-mac.zip
The Mac OS X may have already unzip the file for you, otherwise go ahead and decompress it and double click on the package (pkg)Now install the PAM library
brew install pam_yubico
For good measure, go ahead and reboot. Open a Terminal session and insert your yubikey into a USB port. To create a key type in the following:ykpamcfg -2
Unless you were able to login as root, you will need to copy the key created in /var/root/.yubico into your home directorysudo cp /var/root/.yubico ~/
The .yubico directory nows to be changed to your account.sudo chown -R $(whoami) ~/.yubico
To require the screensaver to have your yubikey inserted to be able to login, edit /etc/pam.d/screensaversudo vi /etc/pam.d/screensaver
Goto the last line that starts with 'auth' and copy [yy] the line and paste [p] it so its the next line.Change the newly created line after 'required' to:
auth required pam_yubico.so mode=challenge-response
Now save the file. Now lets test if it if works.
To test that your yubikey is required to deactivate the screensaver,remove your yubikey when or activate the screensaver, at the login screen type your password.
It should have failed
Re-insert the yubikey, and re-enter the password.
You should now be able to successfully log back in.
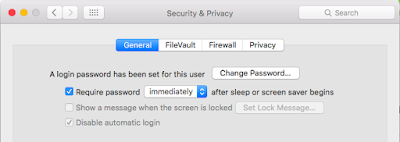
Note: To make sure someone can't bypass the screensaver, be sure to set the select Apple Menu > System Preferences > Security & Privacy. Check "Require password..." and set it to immediately from the dropdown.

Repeat the same process for logging into your Mac except you'll need change the /etc/pam.d/authorization file.
sudo vi /etc/pam.d/authorization
No comments:
Post a Comment